The matter of cleaning brake pads is somewhat overlooked by many considering it’s not something worth to be careful of. Now no matter how good you are with doing DIYs, there’s still a strong need to look into matters, grab the right idea, and then try something you’ve never done before.
Even if it’s called something as basic as cleaning. Because when you get started with the process, there will be some moments you’ll deal with confusion on certain parts that you have no clue about, or maybe you are doing something completely harmful that will end up causing damage.
So, giving some thoughts on learning how to clean brake pads the right way does need some clapping and we are already giving you that.
Here’s How to Clean Brake Pads the Right Way.
To make things simple and understandable, we will be talking in sections. These are basically the parts that involve the entire cleaning process. So, somebody who has never done this before will also find the information helpful. Let’s Get into It!
Get the Suitable Tools
When looking for how to clean brake pads, you want to get suitable tools from the store. To continue the other processes, you definitely need to take all the tools for cleaning without a mess.
While in the store for shopping, you want to get a lint-free shop towel, brake cleaner spray, and needle-nose pliers. You also need to buy a block, coarse and sandpaper, and torque wrench or 2.5 mm Allen key.
On top of that, try to grab a safety glove to do all the processes without making your hand unclean. As you’ll be cleaning the brake pads deeply, it’s quite essential to wear the gloves. So, make sure to take a good pair of safety gloves that fit nicely without giving a tight feel.
These tools are essential that helps the cleaning in the right way. Also, they are helpful for cleaning deeply and doing all the processes simply. After you have bought all the tools, then run to the next step.
Put on Gloves
The next step you want to do is to put on the gloves on your both hands. Since you will be cleaning the brake pads, it is vital to wear gloves before doing the brake pads removable process.
When you are wearing gloves, makes sure your hand is fitting in the right way to do the following process with no snag. If you are done putting on the gloves on both hands, you want to go to the next process.
Remove the Brake Pads from the Bike
After you have done wearing your safety gloves, it is the right time for you to remove the brake parts from your bike. To remove the brake pads, you want to follow some simple rules.
You want to take out the tire from the bike before removing the brake pads. Then, use your newly bought needle-nose pliers to detach the retaining circuit that is positioning in the center of the bike. After that, you want to use the 2.5 mm Allen key or torque wrench to get rid of the secured nut.
With the help of your hand, take out the screw from its place and then take out the brake pads from inside the bike. After that, make sure you have placed the brake pads in a secure place to avoid losing them. Done removing the brake pads? If so, rush to the next step.
Sharp Brake Pads with the Sand and Coarse Paper
After taking out the brake pads, it is better to sharp the front side with the coarse and sandpaper. You see, coarse and sandpaper are a good choice for giving your bike pads sharp finish and better results eventually.
To do this step rightly, you only need to take out your bought coarse and sandpaper for sharpening the brake pads. Makes sure you are doing it after attaching to the bought block to smoothly sharp the surface.
When sharpening the brake pads, you want to do this for some minute and then follow the next step to clean immediately.
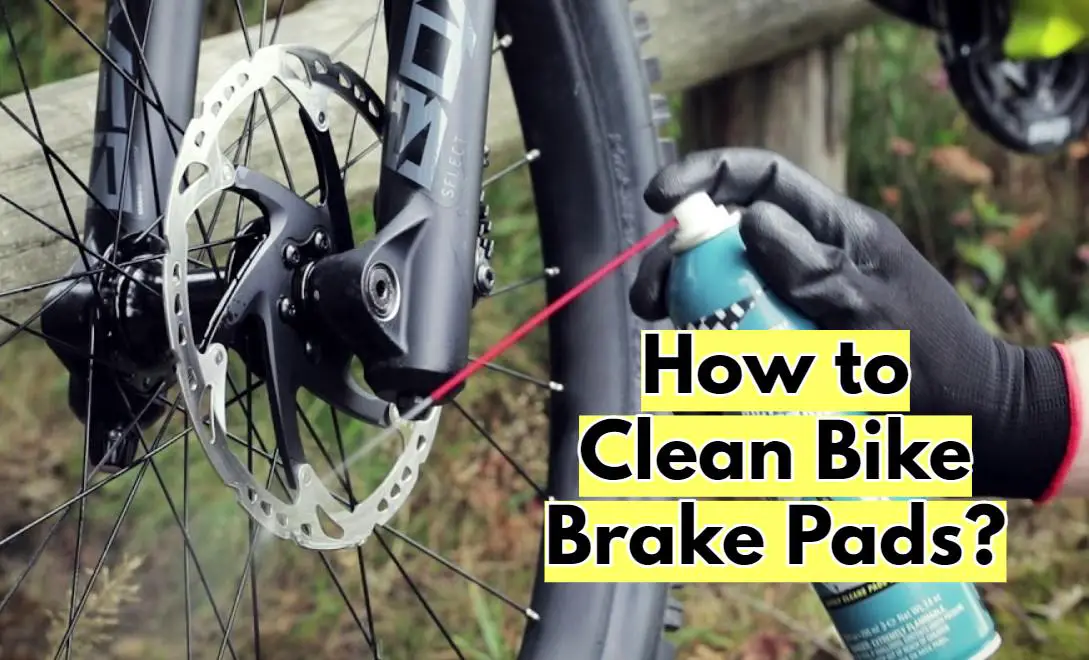
Use the Brake Cleaner Spray
In this step, you want to directly want to clean the brake pads by using the brake cleaner spray for easily remove the stain from it. The brake cleaner spray actually holds strong elements that help the strong and rough stain to get away from the surface easily.
To start this process, you want to take your bought brake cleaner spray and lint-free shop towel to use. Place the towel on the table and then put the brake pads on it. After that, pull the trigger of brake cleaner spray to shoot out all the stain.
Make sure to spray from 18 to 24 inches away from the brake pads to rightly stain away from the surface. If you are done spraying the brake pads, go to the next step.
Dry Out Brake Pads
Once you are done spraying out the brake pads, it’s the right time to dry them out. To do the process rightly, you want to use the towel by wiping it to the brake pads to get rid of the stain easily. You can also dry the brake pads naturally.
Conclusion.
And on that note, we are already by the end of this discussion. Let’s hope you are no more questioning about how to clean brake pads or have any sort of confusion related to it. However, if you do, then don’t sidestep researching further. Be absolutely sure about the entire thing and then proceed. You don’t want to harm it in any way.
Precaution is Always Better Than Paying Replacement Charge.